Management Console Startup Guide
Welcome to SpiderOak Groups! Use this quick guide to help you own, protect, and manage your company's important data.
1. Log In
In your SpiderOak Groups welcome email, select the ‘Access Management Console’ button to log in.
If you don’t have the email, then determine your unique company URL with this formula:
Your _ company _ name-mgmt.spideroakblue.com (Clean identifier by stripping non-alphanum characters and collapsing whitespace into underscore)
Please bookmark this login page so you can access it later.
You won't be able to login from spideroak.com, which is designed for individual users of our SpiderOakONE product.
NOTE: Your admin login is separate from your user account. If you also intend to be an end-user, you will need to add yourself under the Users tab of the console (see below Add User Manually/Add Users with .CSV).
Having trouble logging in? Please contact support at groups@spideroak.com
2. Add your users
As the admin, you will get the most of our your trial by making sure others on your team also sign up and start backing up their desktop. Once they do, their data will populate your Management Console and you can begin to see the value and visibility that brings you.
We recommend sending a brief email to your team letting them know why you are trialing SpiderOak, and why you believe backup is important to your business so it encourages everyone to get started.
Here are some ways you can add users, edit them, and more:
Add a User Manually
- Select the Add User button.
- Enter the user’s name and email address.
- A default group has been automatically created with your company name. If you would like to assign the new user to a different group, simply select another group you have created.
Your new user will get a confirmation email with instructions on how to set up their account.
Add Users with a .CSV
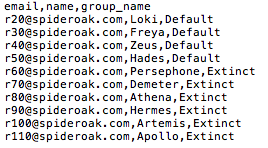
- Create a .csv file, or a plain text file with the extension .txt. You may name this file anything you like. The format should include a header, user email, name, and their group name.
For example:
 2. If you have not already created your user groups, then you must include ‘default’ for the group value of each user.
-
Choose Add CSV under the User’s tab.
-
Select the Choose File button and select your file. SpiderOak will automatically input the values and create each user account.
Each user will get a confirmation email with instructions on how to setup their account.
Edit Users
At some point, you may need to make changes to a user account:
- Locate the user by searching for their email in the search bar.
- Select Detail in the User Detail column. Here you can edit the user’s name, email, change their group or password, and disable or delete the user.
- Select Save Changes at the bottom of the page.
Access a User's Data
As an admin, you can access any data uploaded by a user in your company.
- Select the Detail link of a user.
- Choose Access User’s Data. (If the user has not uploaded any data, this button will not appear.)
- Now you are in the Dashboard for this user’s account. You will see the web portal exactly as the user sees it.
- Browse a user’s backup and shares, or access a specific file or folder. To do this, go to Manage and select the Device you want and navigate as follows. Select any file you wish to download.
Disable a User Account
In the event you need to place a user on legal hold, you can disable their account. This status will prevent the user from being able to access their account:
- Find and select the user.
- Uncheck the Enabled box.
- Select Save. Now this user will no longer be able to connect to SpiderOak via the web or mobile. The user does however retain access through any desktop application that is currently logged in.
Delete a User Account
To delete a user and all of their data within the user account:
- Select the checkbox in the Delete? column next to the user’s name.
- Save Changes at the bottom of the page.
*You can also do this in the User Details section. Select Delete User at the bottom of the page and a confirmation box will appear. Select Yes, Proceed to delete the user and any data that has not been purged.
Purgehold
Our "purgehold” feature allows you as the admin to hold user data even after it has been removed by a user. This can be done on an individual basis to get a point-in-time picture of all data stored by a single user from this date forward.
In addition, a global purgehold can be set to retain removed data for all users over a rolling period of time e.g., the last 90 days.
These settings are invisible to the users and any purged data will still appear to have been removed from the application.
Customize and Sort
These functions can be used to find and monitor users based on their account characteristics. For commonly requested reports, see the Reports tab.
Otherwise, on the Users page, customize and sort columns by any of the following: Name, Email, Share ID, Promo, Creation Time, Last Login, Storage Size, Max Storage Size, Bonus GB, Plan, Group, Enabled/Disabled, and Purgehold Active.

 Admin DOCUMENTATION